Showing posts with label Strawberries. Show all posts

Friday, February 26, 2016

Strawberry Frozen Yogurt Sorbet

Well, well, well. Look what I found sitting in my drafts page... a complete recipe that I never got around posting! 

I still remember that day when I bought a kilo of strawberries from a street vendor downtown and all these ideas of what to do with them were running through my head. I wish I had half of the creativity I had back then, 青春啊~~ Now I'm satisfied just by browsing through food blogs or skimming through a cookbook... absolutely have no urge to make it myself. 

I bought a Kitchenaid ice cream maker attachment 2 years ago and made coconut mango ice cream that ended up sitting in my freezer, untouched. That may be because I lost my sweet tooth, or maybe my metabolism slowed down and I can no longer eat without consequences. Whatever the case, I can't believe I spent 3 hours making this sorbet with a handheld mixer and won't even pick up my ice cream maker now because I'm just too.damn.lazy. Maybe when Nolan's old enough to appreciate my cooking/baking/churning then I'll finally get my motivation back. Looking forward to that day, BUT OMG PLEASE DON'T GROW UP AND BE MY BABY FOREVER.  OK BYE, LOVE, MOM. 


Strawberry Frozen Yogurt Sorbet
INGREDIENTS:
  • 1 pound (450g) strawberries, rinsed and hulled
  • 2/3 cup (130g) sugar
  • 2 teaspoons vodka or kirsch (optional)
  • 1 cup (240g) plain yogurt
  • 1 teaspoon fresh lemon juice
DIRECTIONS:
  1. Slice the strawberries into small pieces. Toss in a bowl with the sugar and vodka or kirsch (if using) until the sugar begins to dissolve [picture 1].
  2. Cover with plastic wrap and let stand at room temperature for 2 hours, stirring once in a while [picture 2].
  3. Transfer the strawberries and their juice to a blender or food processor. Add the yogurt and fresh lemon juice [picture 3]. Pulse the machine until the mixture is smooth. If you wish, press mixture through a mesh strainer to remove any seeds [picture 4].
  4. Chill mixture in the fridge for at least 1 hour.
  5. Place the chilled ice cream mixture in the freezer for 30 minutes.
  6. Beat ice cream mixture with an electric mixer until smooth (you can use a fork instead of an electric mixer, but the ice cream will be less smooth and creamy) [picture 5].
  7. Place ice cream in the freezer for another 40 minutes- then beat with an electric mixer again.
  8. Repeat "40 minute freeze-then-beat cycle" 3 times. This should total 2 1/2 hours of freezing [picture 6].
  9. You can choose to either beat your ice cream mixture every 40 minutes until frozen or let your ice cream mixture freeze on its own. Either method works fine. The more you beat it and the more air incoorporated, the softer it will be. Total freezing time can take anywhere between 3-5 hours.
Strawberry Frozen Yogurt Sorbet

Sunday, June 14, 2009

Strawberry Daifuku

Okay, so i take back what i said in my last post... here's the second strawberry recipe of the season: Strawberry Daifuku! I was on youtube the other day and came across a video for this beautiful mochi dessert and i just couldn't resist. This recipe is pretty easy to make although i did have some problems with the mochi. I'm guessing my glutinous rice flour wasn't the same as the one used in the video because instead of getting a watery mixture, mine just clumped up into a ball of dough. Hmmm... i steamed it anyway and i guess the mochi turned out... alright. It wasn't as elastic as i hoped it would be... but ah well, nothing's perfect XD. The mochi was also pretty hard to handle; i had to dust 2 layers of potato starch on my hands for every daifuku i made, sheesh. So in summary, the red bean paste could've been a bit more moist and the mochi could've been a bit more chewy... but other than that, this is a great dessert that i highly recommend for my fellow bakers. Enjoy!

Strawberry Daifuku
from cookingwithdog and geekchef
INGREDIENTS:
  • AZUKI BEAN PASTE:
  • 400g azuki beans, soaked overnight
  • 3/4 cups of sugar (or more, according to taste)
  • 1 tablespoon honey (or more, according to taste)
  • 1 pinch salt

  • STRAWBERRY DAIFUKU:
  • 9 fresh strawberries (cut off the stems, wash, and pat dry)
  • azuki bean paste
  • 1 cup glutinous rice flour
  • 2 tablespoons sugar (or more, according to taste)
  • 1 cup water
  • Potato starch for dusting
DIRECTIONS:

  1. Wash and drain the azuki beans that were soaked overnight [picture 1].
  2. Place the beans into a pot and pour enough water to cover the beans. Steam the beans for an hour or more until soft [picture 2]. Most of the water should be absorbed by the time the beans are done (drain the beans if there's still a lot of water left).
  3. Add in sugar, honey, and salt [picture 3]. Mix well.
  4. Transfer the beans into a food processor[picture 4]. Blend to the consistency of your choice (chunky/mashed).
  5. Scoop out the mashed beans into a saucepan and set it over low heat. Stir frequently in order to evaporate the excess water [picture 5]. [This step may be excluded if your beans have already reached the right consistency].
  6. Once the azuki bean paste have cooled, take about 1 - 2 tablespoons of paste and shape them into balls. Flatten the paste with your palm, place the strawberry in the center, and push the paste up towards the top. Make sure to cover all sides of the strawberry [picture 6]. Repeat for all 9 strawberries. Cover with a plastic wrap to keep them moist.
    ---------------------------------------------------------------
  7. In a non-stick pot, mix together the sugar and glutinous rice flour [picture 7].
  8. Gradually add in the water and mix until there are no lumps [mine formed into a ball of dough] [picture 8].
  9. Place the non-stick pot into a steamer and steam for 15 minutes.
  10. Remove the pot from the steamer and with a spatula, stir the mochi until even [picture 9].
  11. Transfer the mochi onto a baking sheet that has been generously dusted with potato starch. Take some more potato starch and dust over the mochi. Break the mochi into 9 pieces.
  12. With your hands, shape the mochi into a flat circle. Place the azuki-coated strawberries in the center and spread the mochi up and wrap it [picture 10]. Remember to dust your hands with potato starch frequently since mochi is extremely sticky.
  13. You'll have to work quickly while the mochi is hot or else it will not stretch far enough to wrap the strawberries.

Strawberry Daifuku

Friday, June 12, 2009

Strawberry Jam

My 4th year of school is finally over! All my exams went smoothly and I'll be heading back to Taiwan in a few days :D Hopefully i won't abandon this blog for another 3 months like last summer, we'll see! So anyways, unlike the past few years where I update at least 3+ strawberry recipes per season, this year the only strawberry related update will be this strawberry jam. It's kind of lame, i know. There's nothing challenging about buying a pectin mixture and boiling it with strawberries... but hey, 3 months ago I would've never imagined myself making my own jam so here it is anyway. Making jam is so ridiculously easy... i wonder why there's still such a huge jam section at every supermarket. I made 3 medium jars of jam with just 9 zloty worth of ingredients! I also included some simple instructions on how to properly can your jam so that they could be stored unrefrigerated for a year. If you're interested, more detailed instructions can be found at homecanning.com. So think twice the next time you're about to buy another jar of jelly... all it takes is 30 minutes and you'll have a years' worth of fresh homemade jam in no time.

Strawberry Jam
INGREDIENTS:
  • 500g fresh strawberries
  • 500g Cukier żelujący 1:1 (gel sugar)
    [or Pectin + sugar, amount according to package directions]
DIRECTIONS:

  1. Wash the strawberries cut them into slices or quarters.
  2. Place the strawberries in a large bowl and crush them with a potato masher [picture 1].
  3. Add in 500g of the gel sugar mixture and stir over low heat until the sugar is dissolved [picture 2].
  4. Increase heat to high, and bring the mixture to a full rolling boil [picture 3]. Never stop stirring!
  5. When the mixture reaches a full rolling boil (it continues boiling even when you stir it), your jam is done [picture 4].
  6. Sterilize your jars and caps by boiling them in hot water for 5 minutes [picture 5].
  7. Carefully pour the boiling hot jam into the hot jars, leaving 1/2 an inch of space on the top. Wipe jar removing any stickiness and seal tightly with a cap.
  8. Now place the filled jars back into the water and let it boil for another 10 minutes so that the jar will seal properly [picture 6].
  9. Remove the jars from the boiling water and let it cool for 24 hours.
  10. You can check if the jars are properly sealed if the cap center is pulled down and does not move when you press on it.
  11. Properly canned jam can be stored unrefrigerated for 1 year. But once opened, remember to keep it in the fridge!

Peanut Butter and Jelly Sandwich

Strawberry Jam

Monday, April 06, 2009

Strawberry Mousse and Brownie Cupcakes

I'm in desperate need of motivation to get myself back into the kitchen. Don't know what's gotten into me these days, but cooking/baking just seems like the last thing i want to do. I've been on my elongated Easter break for a while now and the only produce that came out of the oven were these Strawberry Mousse and Brownie Cupcakes. Sigh, i was actually looking forward to trying out some of my highly anticipated recipes during my break... i guess that's not happening anytime soon :( DANG IT. And to make myself sound even more lazy, these cupcakes are actually made from a combination of 2 of my past recipes: brownies + strawberry mousse XD. Lalalala~ So anyways, JLo and I only had one cupcake each this time (as a taste test), and the rest were packaged and specially delivered to JLo's classmate, Anders. We promised him a home-cooked meal about a month ago but our plans were never carried out due to my *)%($ FREAKIN' PHARMACOLOGY (*@&%*@ finals. And since my brain is still recuperating from that traumatic experience, I made the dessert first to carry out the 1st part of our promised dinner. Gahhhh... i feel bad for being so lazy... sorry, Anders! But your chili casserole will come soon :) Hopefully posting this up will motivate me to finish what I've started.

Strawberry Mousse and Brownie Cupcakes
makes 7 - 8 cupcakes
INGREDIENTS:
  • 1/2 cup fresh strawberries, chopped
  • Strawberry mousse [see recipe below]

  • BROWNIES:
  • 1/2 cup butter, melted (i used less)
  • 1 cup sugar (i used less)
  • 1 teaspoon vanilla extract
  • 2 eggs
  • 1/2 cup all-purpose flour
  • 1/3 cup cocoa
  • 1/4 teaspoon baking powder
  • 1/4 teaspoon salt
DIRECTIONS:

BROWNIES:
  1. Stir butter, sugar, and vanilla together [picture 1].
  2. Add eggs and beat well[picture 3].
  3. Separately, mix flour, cocoa, baking powder, salt together[picture 2].
  4. Add the flour mixture to the egg mixture. Stir well [picture 4, 5].
  5. Fill cupcake cups with brownie batter (they should be 2/3 - 3/4 full) [picture 6].
  6. Bake 30 minutes until knife comes out clean [picture 7].
  7. After the cupcakes have cooled, use a knife and cut a hole into the cupcakes. Fill each hole with chopped strawberries [picture 8].
  8. Spoon enough strawberry mousse to cover each cupcake hole [picture 9], refrigerate.
  9. Reserve remaining mousse in a piping bag and refrigerate for 30 minutes until it has slightly solidified. Using the piping bag, decorate the cupcake in any way you'd like, be creative! Don't forget to add a berry on top ;) [picture 10].
=========/=========/=========/=========/=========

Strawberry Mousse

This recipe makes only a small amount of mousse that should be enough to fill and decorate the cupcakes.
INGREDIENTS:
  • 100g fresh strawberries
  • 1/2 egg yolk
  • 2 tablespoons sugar
  • 1/2 teaspoon vanilla extract
  • 50 mL milk
  • 1.5 teaspoons unflavored gelatin
  • 1/2 cup whipping cream
DIRECTIONS:

  1. Blend and puree 100g of fresh strawberries. [picture 1]
  2. In a saucepan, mix the sugar, egg yolk, and vanilla. [picture 2]
  3. Pour the strawberry puree (around 75 mL) into the egg mixture. Mix well. [picture 3]
  4. In another saucepan, add the gelatin and milk and heat until gelatin has dissolved. Pour it into the strawberry mixture and continue heating until everything comes together. [picture 4]
  5. Remove the mixture from the heat and place the saucepan in cold water until it reaches room temperature.
  6. Whip the cream until stiff peaks form. Pour it into the strawberry mixture. [picture 5]
  7. Fold until blended thoroughly. [picture 6]

Special Delivery:
Strawberry Mousse and Brownie Cupcakes

Wednesday, June 18, 2008

Strawberry Mousse Cake and Strawberry Charlotte

So last week my roommate and I had to run some errands downtown... our freakin residence card is being delayed due to the annual "techincal" problem of theirs. Sighhh, it's ridiculous how inefficient Poland can be some times. There was only one lady that was attending the window/stand at the immigration office and I was already getting pretty annoyed waiting in line... then to find out that their problem wont be fixed until AUGUST is just )*(#&%)(*@%&)(#@*%&)(@#&. ARGHHH, I do not want to pay another 3,000 NT for a freakin unnecessary visa. Even though i could just use my Brazilian passport, i still don't want to worry about the 90 days limit. Its not even our fault anyway, at least reimburse us with free visa. Sheeeshhh... Well, after wasting our time at the office, we went to the far ING bank and passed through a strawberry stand. The strawberries looked so fresh and smelled so sweet that you could smell it 2 feet away, no kidding. So on our way back we couldn't resist but to stop by and get ourselves a bag of strawberries each. As if the freshness and prettiness wasn't a good enough reason to get them, then 4.00 zl for 1 kg must be 了吧!! Yep... looking at my past strawberry entries, 4.00 zl for 1 kg by far the cheapest. I could've gotten 2 kgs but I already had 500g of strawberries at home. So yep, that gave me 1.5 kgs of strawberries to work with XD.
After blending 1/3 up for yogurt-shakes, I decided to use some for a Strawberry Mousse Cake. But for some reason i just kept on screwing up and ended up wasting 1 liter of milk, 7 eggs, and tons of whipping cream, sugar, and other ingredients. Sighhh... i was pretty pissed off but hey, if you don't make mistakes, then how can you learn from them, right? So the next day i gave it another go and reduced the size to a small 5.5'' cake. Sigh, 真的是 with low expectations comes great satisfaction... it turned out 10x better than I expected! I divided it into 8 pieces-- gave one to little A, one for myself, and JLo ate the rest... in one sitting ;) Wahahahaa, that felt pretty good. Anyways, here's the recipe!

Sponge Cake
from ytower.com
makes a 8.5'' cake (I halved recipe to make a small 5.5'' cake)

INGREDIENTS:
  • 290 mL (1 and 1/4 cup) all-purpose flour
  • 4 eggs
  • 35 mL milk
  • 1 cup sugar
  • 1/2 teaspoon salt
  • 1 teaspoon vanilla extract
  • 35 mL vegetable oil

DIRECTIONS:

  1. Prepare ingredients: [pictures 1, 2]
    - add sugar and salt together.
    - add milk, oil, and vanilla together.
    - sift the flour.
  2. Add the sugar+salt into the eggs and blend with an electric mixer immediately. [picture 3]
  3. Blend until the egg mixture becomes foamy and tripled in size (around 5 minutes).
  4. Add in the flour and mix well. [picture 4]
  5. Pour some of the mixture into the milk+oil and stir until well blended. [picture 5]
  6. Pour it back into the original cake mixture and use your spatula to fold until well blended. [picture 6]
  7. Pour into a cake mold and bake for 35 minutes at 180 C (Gas 4). [picture 7]
Strawberry Mousse Cake
makes a small 5.5'' cake
INGREDIENTS:
  • 2 layers of sponge cake (cut off 1 cm around the edges)
  • 200g fresh strawberries
  • 1 egg yolk
  • 3-4 tablespoons sugar
  • 1 teaspoon vanilla extract
  • 100 mL milk
  • 2.5 teaspoons unflavored gelatin
  • 1 cup whipping cream
  • 150g fresh strawberries sliced in half.
DIRECTIONS:


  1. Blend and puree 200g of fresh strawberries. [picture 1]
  2. In a saucepan, mix the sugar, egg yolk, and vanilla. [picture 2]
  3. Pour the strawberry puree (around 150 mL) into the egg mixture. Mix well. [picture 3]
  4. In another saucepan, add the gelatin and milk and heat until gelatin has dissolved. Pour it into the strawberry mixture and continue heating until everything comes together. [picture 4]
  5. Remove the mixture from the heat and place the saucepan in cold water until it reaches room temperature.
  6. Whip the cream until stiff peaks form. Pour it into the strawberry mixture. [picture 5]
  7. Fold until blended thoroughly. [picture 6]
  8. Place the 1st layer of sponge cake in the center of the mold and arrange sliced strawberries on top. Pour in the mousse until strawberries are covered. [picture 7]
  9. Place the 2nd layer of sponge cake in the center and cover it with more mousse. [picture 8, 9]
  10. Refrigerate until set (4 hours). Decorate and serve.


Strawberry Mousse Cake

For Strawberry Charlotte:
  1. Dip the bottom of the ladyfingers in raspberry or strawberry syrup.
  2. Line up the ladyfingers side by side along your springform pan.
  3. Fill up the inside as directed with the Strawberry Mousse Cake recipe above.


Strawberry Charlotte

Friday, June 13, 2008

Berry-Mi-Su: Berry-me-up

I went to Italy for the 2nd time last December with JLo. On our last night there, while we were packing, JLo suddenly realized that we FORGOT to eat Tiramisu (his favorite dessert). 到了ITALY, 該去的地方都去了, 該看東西的都看了, but his trip wouldn't be complete without a Tiramisu. Well, it was already 11pm when we realized this (and we've already had an exhausting day walking across Rome cuz we were too cheap to buy metro tickets XD), but he still dragged me out of our hostel for our last meal. We went to one restaurant and ordered seafood pasta (another must). Then to a second restaurant where we finished our night off with a latte and tiramisu. Omg, you REALLY have to go to Italy for the best Tiramisu. On my 2 trips to Italy, no Tiramisu I’ve tasted has ever failed me. That piece of tiramisu we had was so good that every time I tell JLo about my next baking/dessert project, he'll always go, "Noooooo.... I want Tiramisu... make that instead!" HMPH, 有得吃就好了, 還讓你挑??

I REALLY don't like being told what to do... so instead of making what he wants (the original Tiramisu), i tweaked it up a little and made a BERRY-mi-su. Tee-hee. What is it? Berry-misu is just a way to jazz up the normal, traditional dessert you can find almost everywhere (ahem, JLo). This Berry-misu tasted good the way it was… but even better when it's half frozen!
Oh yea, it took me a while to blog about the berry-mi-su... but it took 3 different desserts to FINALLY use up my 1kg of strawberries :)

Berry-Misu: Berry-Me-Up
from Rachael Ray's Berry-Mi-Su: Berry-Me-Up and ytower.com.tw

INGREDIENTS:
  • 2.5 teaspoons un-flavored gelatin
  • 90mL sugar
  • 75mL water
  • 250g marscapone cheese
  • 150mL whipping cream
  • Lady fingers
  • 1/2 cup coffee
  • Fresh strawberries

DIRECTIONS

  1. Heat water, sugar, gelatin until dissolved.
  2. Whip cream until 60% whipped.
  3. Thaw marscapone cheese until room temperature.
  4. Add the marscapone into the gelatin mixture and mix until well blended.
    (you may want to use a electric mixer)
  5. Fold in the whipped cream.
  6. Dip ladyfingers in coffee.
  7. Layer the Berry-Mi-Su with cream, dipped lady fingers, sliced strawberries. Repeat until ingredients are used up.
  8. Refrigerate for 3 hours or more until set.
  9. Decorate the top with fresh strawberries, strawberry jam, chocolate syrup, or anything you like.

Basic Steps:


Berry-Mi-Su: Berry-Me-Up

Wednesday, June 04, 2008

Light (Strawberry) Cheesecake

Continuing with the strawberry theme, I decided to use my strawberries for a light cheesecake. I've never been a fan of cheesecakes; a few bites are okay, but trying to finish a big slice can be torturing sometimes. Some are just so thick and concentrated that even swallowing can be a problem for me. I know, i can always choose to not finish it... but seeing people throwing/wasting/not finishing their food is one of my biggest pet peeves. Which is why 95% of the time, i always finish my plate of food... not matter how full i am or how bad it is. The other 5% is left for foods that are inedible, burnt, expired, or anything with bananas. XD The only cheesecake I can tolerate in large amounts are probably the ones they sell in Taiwan. I'm talking about the oval shaped ones they sell in big supermarkets. It tastes more like a cake than an actual cheesecake... and that's probably why i like them. Waha. I was afraid my light cheesecake would fail and turn out to be too heavy so i baked them in little muffin cups. But turns out i worried for nothing... they came out just fine :D So i poured the remaining cake batter into a small cake mold and baked it. This online recipe is a keeper. The only tricky part would be beating the egg whites- make sure the eggs are at room temperature before you start anything!

Light (Strawberry) Cheesecake
from skybake.com in chinese
(if you search their videos, you can see the video demonstration. Somehow the link doesnt appear on the site so i couldn't copy and paste)
INGREDIENTS:
  • 200g cream cheese
  • 110 mL milk
  • 4 egg yolks
  • 70mL butter
  • 3.5 tablespoons flour
  • 1.5 tablespoons corn starch
  • 5 egg whites
  • 130 mL sugar
DIRECTIONS:

  1. Add the cream cheese + milk together and heat it up in a double boiler, stirring constantly [picture 1].
  2. When the cream cheese has dissolved, add the butter and stir until smooth. Then add in the egg yolks and mix [picture 2, 3].
  3. Sift the flour and corn starch together and add into cream cheese mixture until thoroughly blended. Remove from heat [picture 2, 3].
  4. Beat egg whites with a electric mixer/whisk until it starts to bubble. Gradually add sugar, continuing to beat until it forms peaks [picture 4, 5].
  5. Pour the egg whites into the cream cheese mixture and fold until thoroughly blended [picture 6].
  6. Pour the cheesecake batter into a prepared mold [picture 7].
  7. Place your mold in a shallow pan of water, and bake until edges have pulled away [picture 8]. (45-60minutes for cake molds. 20-30 minutes for muffin pans.)
  8. Let the cake cool down and decorate with fresh strawberries and strawberry jam.


Light (Strawberry) Cheesecake

Monday, June 02, 2008

Strawberry Milkshake

Strawberry season is back. Once again, i went ahead and bought myself 1kg of strawberries. But this time, I'm not gonna go into how cheap strawberries are in Poland. Compared to the 1kg/6.49 zl last year.... the price doubled to 1kg/11.99zl. CRAPPP...!!! What's happening to this world. Everything's getting more expensive while the freakin' USD has no more value. Ugh, i hope i don't get too broke to the point i can't even keep a food blog alive. How sad will that be. Hmph.

On a brighter note, since i have a limited idea on what to do with my 1kg of strawberries, I decided to blend half of it up and make some strawberry milkshake. Yes, fresh strawberries, none of that McDonald's crap. I would like to say it's healthier than McDonald's...but thanks to the ice-cream, it only wins by a little. I could've gone for the low-fat version but... Nah! There's nothing wrong with indulging yourself in some guilty pleasure before you revert back to your summer dieting mode... right?

Strawberry Milkshake
from Billie's Favorite Strawberry Milk Shake
INGREDIENTS:
  • 500g fresh strawberries
  • 1 qt. vanilla ice cream
  • 1/2 cup milk

DIRECTIONS:

  1. Process all ingredients in a blender until desired consistency, stopping to scrape down sides.
  2. Serve immediately.

NOTE:
- For low-fat, cheaper milkshake, replace vanilla ice-cream with frozen strawberry yogurt.
- For a thinner shake, add up to 1/4 cup more milk.


Strawberry Milkshake

Wednesday, May 21, 2008

Strawberry Chocolate Mousse Cake

The picture on the left is my 3rd (and finally successful) attempt at making mouse cakes. For the sake of writing whatever to filling up a (what would have been) blank page, here's a brief history of my previous unfortunate failures:

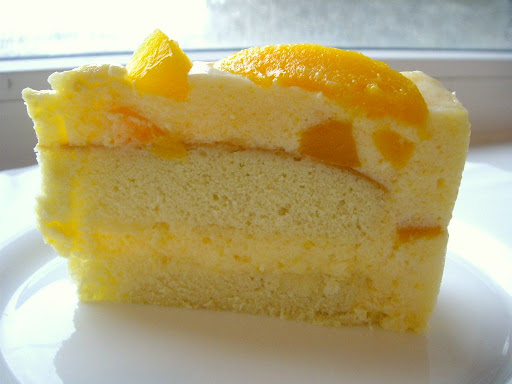
Failure #1: Peach Mousse Cake
Yes okay, structural-wise, there was nothing wrong with it. But it tasted like nothing but pure sugar... I don't know why I even bother calling it a Peach cake. And now that I think of it, what was I thinking giving my roommate a slice?! She must've thought I was purposely trying to put her into a diabetic coma (hyperglycemic). Sorry, my bad... :P
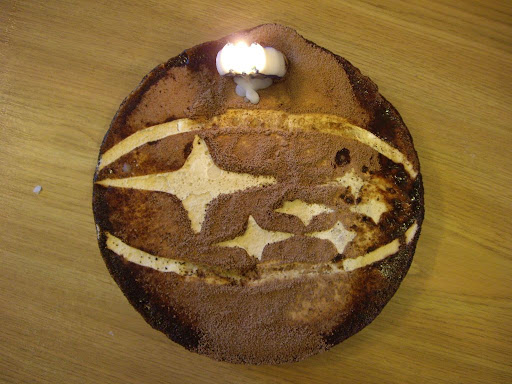
Failure #2: Coffee Mousse Cake (picture 2)
This mousse cake currently ranks as my Number One culinary disaster. I actually re-made the cake twice. And to make things even worse... this was actually JLo's 24th birthday cake. HAHAHAHA. I know, I know... I deserve a bad-girlfriend-slap. But hey, at least i tried decorating it into a Subaru sign (his favorite) and making it coffee-flavored (his other favorite)! The cake was basically raw dough and the mousse was basically... a layer of crap.

Now back to my 3rd attempt: Strawberry Chocolate Mousse Cake. My my, just when i was about to give up on anything having to do with mousse, God showed me kindness XD. It's true what they say--with low expectations, comes great satisfaction. This has become JLo's favorite non-coffee dessert (which is a rare thing). I am also happy to say that mousse cakes have officially become my favorite type of dessert.

Strawberry Chocolate Mousse Cake
makes one small 5.5'' cake
INGREDIENTS:
  • 1 layer of chocolate cake/brownies.
  • 300g fresh strawberries
  • 2 tablespoons fine sugar
  • 1 egg yolk
  • 1 teaspoon vanilla essence
  • 3 tablespoons chocolate powder
  • 2 teaspoons un-flavored gelatin
  • 150 mL milk
  • 1.5 cup whipping cream (30%)
  • 1 tablespoon sugar

DIRECTIONS:

  1. Prepare the layer of cake/brownie and place it in your cake mold.
  2. Slice 1/2 of the strawberries in half, arranging them around your mold (touching, side-by-side, pointed ends up, with cut sides against the side of the mold).
  3. Place the remaining half of strawberries in the center. Set aside [picture 1].
  4. In a bowl, mix together sugar, egg yolk, vanilla, and chocolate powder.
  5. In another small saucepan, add gelatin and milk. Heat until gelatin is dissolved.
  6. Pour the milk mixture into the chocolate mixture and mix well. (Place the bowl in cold water bath while mixing, the mixture should start to thicken as the temperature cools down) [picture 2].
  7. In a seperate bowl, whip the cream with 1 tablespoon of sugar until stiff peaks form [picture 3].
  8. Fold the whipped cream into the chocolate mixture until blended thoroughly [picture 4].
  9. When done, pour it into your mold until it covers the strawberries.
  10. Refrigerate until set (4 hours).
  11. Decorate and serve!


Strawberry Chocolate Mousse Cake

Monday, June 11, 2007

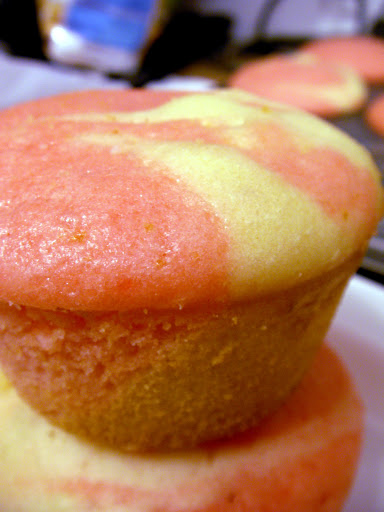
Strawberry Marble Muffins


Niieeeehhhh. forget the last post, i still went back to the kitchen afterall. But i will keep this short and hopefully go back to study soon.

I used to make muffins like... every other day until i got sick of baking the same flavors all the time (Coffee Chocolate Coco, Blueberry, and Apple Cinnamon). They're good, but you just dont get any satisfaction making the same things over and over again. I had plans to study last night, i really did, but 手太閒 and............ out came my first strawberry marble muffins! It was worth giving up my precious study time. XD

Strawberry Marble Muffins

  • Make 2 batters of normal muffin mix.

  • Add strawberry gelatin to one of them and mix well.

  • Spoon the white batter and the pink batter into your muffin wells side-by-side.

  • Use a knife and cut through the batter to mix the colors.

  • Bake for 20 minutes.

  • For other variations, use different flavored jello.


Monday, June 04, 2007

New and Improved Flaky Pie Crust

So yes, i made strawberry pie again after my pie crust failure a few days ago. This time i did some extensive research on pie crusts intead of trusting some overly easy recipes that makes everything sound too simple.
Thanks to: http://beyondsalmon.blogspot.com/2006/03/technique-of-week-pie-and-tart-dough.html , I was able to make a perfect pie crust.

So what did i do differently this time?
  • Chill EVERYTHING beforehand (flour, butter, water...etc)
  • Use ICE cold water.
    [ The reason why everything has to be kept cold is to keep the butter from melting. The small butter chunks will create layers with the flour which is what makes the pie flaky. ]
  • Do not overwork the dough.
  • Refridgerate the dough for at least 30 minutes before rolling it out.
  • After you roll out the dough and placed it in your pan, refridgerate it for another 30 minutes.
  • Bake pie crust for 20 minutes until golden brown.
  • Poke holes onto the crust with a fork if it starts to puff up.

Here's the new and improved Pie Crust Recipe:

Flaky Pie Crust
makes one 8 inch pie crust

INGREDIENTS

  • 1 1/4 cups all-purpose flour
  • 1/4 teaspoon salt
  • 1 - 2 teaspoons of sugar
  • 1/2 cup shortening, butter, or margrine. CHILLED
  • 3 tablespoons ICE COLD water (preferably with ICE)

DIRECTIONS

  • Whisk the flour, salt. and sugar together in a medium size bowl.
  • With a pastry blender, cut in the cold shortening/butter until the mixture resembles coarse crumbs.
  • Drizzle 2 to 3 tablespoons ice water over flour. Toss mixture with a fork to moisten, adding more water a few drops at a time until the dough comes together.
  • Gently gather dough particles together into a ball. Wrap in plastic wrap, and chill for at least 30 minutes before rolling.
  • Roll out dough, and put in a pie plate. Fill with desired filling and bake.

This time i give my pie a 9 out of 10... just cuz there's always room for improvement :) .
Ahh, i wish strawberry season'll last forever.

Friday, June 01, 2007

Fresh Strawberry Pie

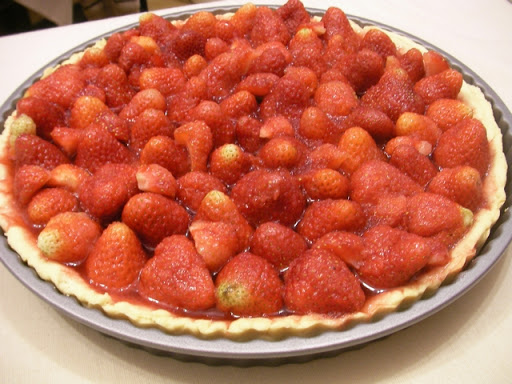
PP, which stands for Piotr i Paweł (Peter and Paul), is a mini-supermarket behind our dorm. Every year around this time, they start selling strawberries by kilos. I remember buying a 2 kg box of strawberries last year and ended up throwing half of it away because it rotted before I could finish it all. This year, PP 變聰明了 and they're selling it by 500g or 1kgs. 500gs for 3.49zl (41NT) and 1kg for 6.49 (about 76NT) SOOOOOOO便宜!!! How could I resist not buying another box?? So yea, I decided to make a strawberry pie and bought the 1kg box. I've had different kinds of strawberry pies before (the mousse-y kind), but the 1st time I had one like this was in high school...junior year I think? Jinny bought an entire pie from the bake sale and we ate it during lunch. It was so good that I tried to make it at home with a different recipe that used only cornstarch (no gelatin because my health-freak parents won't let me buy jello...too much artificial coloring/flavoring they said). It turned out alright... not as good as the one Jinny bought though. It was too sweet and the color was ugly. Looked kind of like this but 10 times uglier. Hahaha. I gave up on trying again because strawberries in Taiwan are expensive. So just imagine how happy I was when I saw dirt cheap strawberries at PP :D! Hao bah, here's the recipe:

Basic Flaky Pie Crust (SEE NEXT POST FOR THE NEW AND IMPROVED RECIPE)
from www.allrecipes.com

INGREDIENTS

  • 1 1/4 cups all-purpose flour
  • 1/4 teaspoon salt
  • 1/2 cup shortening, chilled
  • 3 tablespoons ice water

DIRECTIONS

  • Whisk the flour and salt together in a medium size bowl.
  • With a pastry blender, cut in the cold shortening until the mixture resembles coarse crumbs.
  • Drizzle 2 to 3 tablespoons ice water over flour. Toss mixture with a fork to moisten, adding more water a few drops at a time until the dough comes together.
  • Gently gather dough particles together into a ball. Wrap in plastic wrap, and chill for at least 30 minutes before rolling.
  • Roll out dough, and put in a pie plate. Fill with desired filling and bake.

Comments:
This recipe makes one 9 inch pie. I have a 12'' pie pan so i just added the ingredients as needed and poured in a little bit of vanilla extract. I think I added a little bit too much of the vanilla because the crust tasted kind of... soapy to me. So if you're gonna add vanilla, remember to add a bit of sugar in it too.

Fresh Strawberry Pie
from www.allrecipes.com

INGREDIENTS
  • 2 (8 inch) pie shells, baked
  • 2 1/2 quarts fresh strawberries
  • 1 cup white sugar
  • 2 tablespoons cornstarch
  • 1 cup boiling water
  • 1 (3 ounces) package strawberry flavored gelatin
DIRECTIONS
  • In a saucepan, mix together the sugar and corn starch; make sure to blend corn starch in completely.
  • Add boiling water, and cook over medium heat until mixture thickens. Remove from heat.
  • Add gelatin mix, and stir until smooth. Let mixture cool to room temperature.
  • Place strawberries in baked pie shells; position berries with points facing up.
  • Pour cooled gel mixture over strawberries.
  • Refrigerate until set. Serve with whipped cream, if desired.

Comments:
This recipe makes 2 pies so i halved it.
I used about 1/3 cups of sugar instead of 1/2 C since the gelatin is already sweet.
It is better to add warm water (instead of boiling) to the sugar+cornstarch mixture and let it heat up until it thickens. This way the cornstarch will dissolve evenly without the lumps. Remember to keep on stirring the mixture until it thickens.
After adding the gelatin, the mixture will look like Jam. If it looks too thick to pour, add a some water (but not too much!).
Pour the mixture evenly over the strawberries. Make sure you cover all the 洞洞.


This recipe is fairly easy and good. I give my pie a 7 out of 10. The filling was a 9 but the crust was 5. So overall, it's a 7. Mr. Lo liked it but i think he's just saying so 因為他怕說錯話以後就沒東西吃了... hohoho. I'm gonna make this pie again and i'll remember to update on how it turned out.

Oh, by they way, Mr. Lo and I made Pizza again.
SOOO GOOD I TELL YOU.