Sunday, January 31, 2010

Beef Stroganoff

I'm sorry guys, I've been on a streak this month with updating but it might get a little slow in February. Why? I blame it on myself. You see, even though Christmas is over, that doesn't mean that SALES are too. I've caught on to the tail of the last discount weeks and somehow drained out the remaining funds in my checking account, hahaha. But just so you know, i'm not a shopaholic or anything... cuz #1, i didn't have much in that account to begin with and #2, i really don't like to shop. Wait, don't get me wrong, who doesn't like getting new clothes and shoes, right? But it's the process of shopping that I hate. Returning home empty-handed after a whole afternoon of window-shopping and skimming through hangers just isn't my thang. I only enjoy shopping when there's a specific thing i have in mind, and sometimes that means taking a few days going through a few malls before I finally find it. So you see, shopping is more like a biannual activity for me. But I guess these modest shopping habits are partly why the sudden emptying of my bank account came as such a shock. It was just supposed to be: errands--> quick lunch--> home--> done, BAM! I wasn't expecting to be spending any money on that woeful afternoon but it just sorta happened. So now with pockets short on cash, it's probably best that I catch an early start on the dieting plans that I've been thinking about since the return from my all-inclusive (food and drink) trip in Egypt.

So before i get into my penny-pinching mode, here's a recipe for an extravagant Beef Stroganoff. Okay fine, beef stroganoff isn't an extravagant dish... but since I never use red wine when i cook, it's definitely extravagant when i finally get a chance to do so (even with just a quarter cup)! See? i'm so easily satisfied, living on a budget shouldn't be a problem at all. Let's just hope the currency exchange rates gets better soon... i'm in desperate need of złotys!

Beef Stroganoff
from Fast Food
Serves 4
INGREDIENTS:
  • 1 1/4 pounds beef rib-eye or rump steaks
  • 1/2 cup seasoned all-purpose flour
    (season with 1/2 teaspoon salt, 1/4 teaspoon pepper)
  • 3/4 pound fettuccine / tagliatelle / pasta of your choice
  • 1/4 cup butter
  • 1 onion, finely chopped
  • 3 3/4 cups button mushrooms, thickly sliced
  • 1 tablespoon tomato paste
  • 1/4 cup red wine
  • 1 1/4 cups whipping cream (i used 200 mL)
  • Salt and pepper to taste
DIRECTIONS:
  1. Cook the pasta in a large saucepan of rapidly boiling salted water until al dente [picture 1].
  2. Pound the slices of beef between 2 sheets of plastic wrap with a mallet or rolling pin until they are half their thickness. Cut each slice into strips, about 1/2 inch wide. Place in a pastic bag with the seasoned flour and shake to coat the beef [picture 2]. [Remember to coat it with flour just RIGHT before you pan-fry it, or else the meat will stick together if you leave it for too long].
  3. Melt 2 tablespoons of butter in a frying pan over medium heat and cook the onion for 2 minutes [picture 3].
  4. Add the beef in batches and cook for 5 minutes or until evenly browned [picture 4]. Remove from the pan and keep warm.
  5. Heat the remaining butter in the pan and add the mushrooms, stirring, for 2 - 3 minutes or until soft and lightly browned [picture 5].
  6. Add the tomato paste and the red wine [picture 6, stirring continuously for 2 minutes or until the sauce has reduced [picture 7].
  7. Add the beef [picture 8], stir in the cream [picture 9], then reduce the heat to medium-low and simmer gently for another minute or until the sauce has thickened.
  8. Serve warm with the pasta.
Beef Stroganoff

Wednesday, January 27, 2010

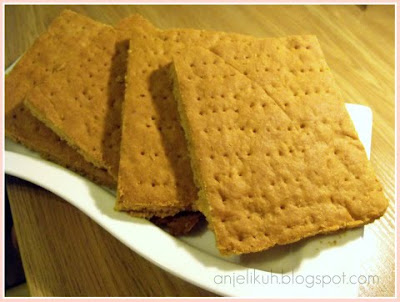
Daring Bakers' Gluten Free Graham Wafers & Nanaimo Bars

The January 2010 Daring Bakers’ challenge was hosted by Lauren of Celiac Teen. Lauren chose Gluten-Free Graham Wafers and Nanaimo Bars as the challenge for the month. The sources she based her recipe on are 101 Cookbooks andwww.nanaimo.ca.

With the Winter Olympics in Canada next month, Lauren challenged us to make a popular Canadian dessert: Nanaimo Bars. In the words of Lauren, "Nanaimo Bars are a classic Canadian dessert created in none other than Nanaimo, British Colombia. In case you were wondering, it’s pronounced Nah-nye-Moh. These bars have 3 layers: a base containing graham crackers, cocoa, coconut and nuts, a middle custard layer, and a topping of chocolate". The difficult part for me wasn't these bars itself, it was the gluten-free graham crackers that are used for the bottom base layer. Of course, we could've gone wheat for them crackers if we'd like, but hey, it wouldn't be a challenge if we all chose the easy way out, right?

So for the graham wafers, I used a 1:1 ratio on the glutinous rice flour and tapioca starch since that's all i had in hand. As for the honey, i replaced it with sweetened condensed milk. I used normal white sugar instead of dark brown, which explains the my pale-looking dough. But despite the little changes i had to make, these graham crackers still turned out amazing! The whole kitchen and dorm hallway smelled of sweet goodness and i was so happy to see that the crackers have baked properly despite some trouble I had with the gluten-free dough which was almost impossible to handle. As for the Nanaimo bars, ehhhhh... let's just say I'm glad they freeze well because it's been sitting in my freezer for about 3 days now... and the only slice JLo and I had was for the initial taste test. It was just too sugary, sweet, and buttery for our liking :( You're thinking: Is that even possible?? But yea, unfortunately JLo and I just don't have that strong of a sweet tooth. The graham wafer recipe, though, is definitely a keeper. So thank-you Lauren for sharing it with us and for hosting the January challenge!

Gluten-Free Graham Wafers
INGREDIENTS:
  • 1 cup (138 g) (4.9 ounces) sweet rice flour (also known as glutinous rice flour)
  • 3/4 cup (100 g) (3.5 ounces) tapioca starch/flour
  • 1/2 cup (65 g) (2.3 ounces) sorghum flour
  • 1 cup (200 g) (7.1 ounces) dark brown sugar, lightly packed
  • 1 teaspoon (5 mL) baking soda
  • 3/4 teaspoon (4 mL) salt
  • 7 tablespoons (100 g) (3 ½ ounces) unsalted butter (cut into 1-inch cubes and frozen)
  • 1/3 cup (80 mL) Honey, mild-flavoured
  • 5 tablespoons (75 mL) whole milk
  • 2 tablespoons (30 mL) pure vanilla extract
DIRECTIONS:
  1. In the bowl of a food processor fitted with a steel blade, combine the flours, brown sugar, baking soda, and salt. Pulse on low to incorporate. Add the butter and pulse on and off, until the mixture is the consistency of a coarse meal [picture 1]. If making by hand, combine aforementioned dry ingredients with a whisk, then cut in butter until you have a coarse meal. No chunks of butter should be visible.
  2. In a small bowl or liquid measuring cup, whisk together the honey, milk and vanilla. Add to the flour mixture until the dough barely comes together [picture 2]. It will be very soft and sticky [picture 3].
  3. Turn the dough onto a surface well-floured with sweet rice flour and pat the dough into a rectangle about 1 inch thick [picture 4]. Wrap in plastic and chill until firm, about 2 hours, or overnight.
  4. Divide the dough in half and return one half to the refrigerator. Sift an even layer of sweet rice flour onto the work surface and roll the dough into a long rectangle, about 1/8 inch thick. The dough will be quite sticky, so flour as necessary. Cut into 4 by 4 inch squares. Gather the scraps together and set aside. Place wafers on one or two parchment-lined baking sheets. Chill until firm, about 30 to 45 minutes. Repeat with the second batch of dough.
  5. Adjust the rack to the upper and lower positions and preheat oven to 350 degrees Fahrenheit (180 degrees Celsius).
  6. Gather the scraps together into a ball, chill until firm, and reroll. Dust the surface with more sweet rice flour and roll out the dough to get a couple more wafers.
  7. Prick the wafers with toothpick or fork, not all the way through, in two or more rows.
  8. Bake for 25 minutes, until browned and slightly firm to the touch, rotating sheets halfway through to ensure even baking. Might take less, and the starting location of each sheet may determine its required time. The ones that started on the bottom browned faster.
  9. When cooled completely, place enough wafers in food processor to make 1 ¼ cups (300 mL) of crumbs. Another way to do this is to place in a large ziplock bag, force all air out and smash with a rolling pin until wafers are crumbs.
  10. If making the graham crackers with wheat, replace the gluten-free flours (tapioca starch, sweet rice flour, and sorghum flour) with 2 ½ cups plus 2 tbsp of all-purpose wheat flour, or wheat pastry flour. Watch the wheat-based graham wafers very closely in the oven, as they bake faster than the gluten-free ones, sometimes only 12 minutes.
  11. The graham wafers may be kept in an airtight container for up to 2 weeks.

Nanaimo Bars
INGREDIENTS:
  • BOTTOM LAYER:
  • 1/2 cup (115 g) (4 ounces) Unsalted Butter
  • 1/4 cup (50 g) (1.8 ounces) Granulated Sugar
  • 5 tablespoons (75 mL) Unsweetened Cocoa
  • 1 Large Egg, Beaten
  • 1 1/4 cups (300 mL) (160 g) (5.6 ounces) Gluten Free Graham Wafer Crumbs (See previous recipe)
  • 1/2 cup (55 g) (1.9 ounces) Almonds (Any type, Finely chopped)
  • 1 cup (130 g) (4.5 ounces) Coconut (Shredded, sweetened or unsweetened)

  • MIDDLE LAYER:
  • 1/2 cup (115 g) (4 ounces) Unsalted Butter
  • 2 tablespoons and 2 teaspoons (40 mL) Heavy Cream
  • 2 tablespoons (30 mL) Vanilla Custard Powder (Such as Bird’s. Vanilla pudding mix may be substituted.)
  • 2 cups (254 g) (8.9 ounces) Icing Sugar

  • TOP LAYER:
  • 4 ounces (115 g) Semi-sweet chocolate
  • 2 tablespoons (28 g) (1 ounce) Unsalted Butter
DIRECTIONS:
  1. For bottom Layer: Melt unsalted butter, sugar and cocoa in top of a double boiler. Add egg and stir to cook and thicken. Remove from heat. Stir in crumbs, nuts and coconut. Press firmly into an ungreased 8 by 8 inch pan [picture 2].
  2. For Middle Layer: Cream butter, cream, custard powder, and icing sugar together well. Beat until light in colour. Spread over bottom layer [picture 3].
  3. For Top Layer: Melt chocolate and unsalted butter over low heat. Cool. Once cool, pour over middle layer and chill [picture 4].

Gluten Free Graham Wafers

Nanaimo Bars

Saturday, January 23, 2010

Toad in the Hole

Did i catch your attention with the title? If so, good! If not, you need to read it again because who wouldn't go, "what the heck is a toad in the hole? and who the heck puts toads in their food?!" with a dish name like that! I know because that was my reaction when i first saw it. But unlike you, who obviously continued reading, i didn't bother to find out what the recipe consisted of since the name already grossed me out a little. But when i finally revisited my cookbook last week, i found out that Toad in the Hole was just a simple English dish of sausages baked in Yorkshire pudding. Apparently, the people back in the days thought the sausages looked like toads peeping out of a hole-- hmmm, REALLY? I get pigs in a blanket, or even tiger bites pig... but toad in the hole? That's pushing it, buddy! But who knows, maybe sausages looked differently back then... or maybe they used crumbled sausages which created rough bumps resembling a toad's skin? Whatever their rationale was, i guess it doesn't really matter anymore cuz they have successfully "marketed" the dish with that name anyway. An ordinary sausage bake such as this would never have made it to my dining table if it wasn't for its bizzare name that made me look twice. And after giving it a try, it turned out to be quite tasty. All the steps are very simple with the only downside of its long baking time (about 1 hour total). Other than that, Toad in the Hole makes a perfect breakfast or brunch casserole.

Toad in the Hole
Derived from Miranda Shearer's "Cheap as chips..." and bbcgoodfood.com
INGREDIENTS:
  • For the TOAD:
  • 6 thick pork sausages
  • 6 slices of bacon
  • 1 onion, thinly sliced
  • 3 tablespoons olive oil

  • For the BATTER:
  • 125 grams all-purpose flour (about 1 cup and 2 tablespoons)
  • 2 eggs
  • 150 ml milk
  • 150 ml water
  • 1 teaspoon wholegrain mustard
  • Salt and pepper to taste
DIRECTIONS:
  1. Preheat the oven to fan 200C/conventional 220C/ gas 7.
  2. Sift the flour and a make a well in the center and crack in the egg. Beat lightly,then gradually pour in half the milk and water, beating all the time to form a smooth,thick batter. Continue for 2 minutes,then stir in the remaining liquid [picture 1]. (The batter can be made several hours ahead of time, although contrary to popular opinion it is not improved by standing.)
  3. Wrap a bacon rasher around each sausage then put them, spaced apart, in a large roasting tin (preferably metal) [picture 2]. Scatter over the onion and drizzle with oil [picture 3]. Bake for 15-20 minutes until the bacon and sausages are starting to colour and the onion is tinged brown at the edges.
  4. Remove from the oven and quickly pour the batter over the sausages [picture 4]. Return to the oven for a further 35-40 minutes until the batter is crisp and well risen [picture 5, 6].
For the Gravy:
INGREDIENTS:
  • 2 tablespoons olive oil
  • 1 onion , thinly sliced
  • 1 tablespoon all-purpose flour
  • 2 teaspoons wholegrain mustard
  • 2 teaspoons Worcestershire sauce
  • 300 ml chicken or vegetable stock
  • Salt and pepper to taste
DIRECTIONS:
  1. While the Toad in the Hole is baking, make the gravy. Heat the vegetable oil in a small pan, add the onion and fry gently for 5 minutes until softened and lightly coloured [picture 1].
  2. Stir in the flour and cook for 1 minute [picture 2].
  3. Add the mustard, Worcestershire or soy sauce and stock and bring to the boil, stirring [picture 3].
  4. Simmer for 15 minutes, then taste and add more salt and pepper if necessary [picture 4].
  5. Serve the toad with cabbage or broccoli and lashings of gravy.
Toad in the Hole with Gravy

Wednesday, January 20, 2010

Savory Cheese Flapjacks

The very first cookbook that i've owned since coming to POZ is a cute little one called "Cheaper than chips, better than toast" by Miranda Shearer. I received it as a Christmas gift from my aunt Lisa back in 2006, just right before i started taking interest in cooking/baking. But with the lack of pictures (yes, i'm really shallow and visual when it comes to reading), i left that book to age on my shelf and only recently rediscovered the wonders hidden inside. This cookbook consist of many simple British recipes designed for the average busy, money-clenching college student who still yearns for a nice home-cooked meal after a long day of classes. Sound much like me? hell ya! So here I am sharing a recipe for a little snack that I fell in love with-- Cheese Flapjacks!

I know, i know... I also had no idea what flapjacks were until i was enlightened by Wikipedia, "...a flapjack is a baked bar biscuit, cooked in an oven tin and cut into rectangles, made from rolled oats, fat (typically butter), brown sugar and usually Golden syrup or honey". But unlike the traditional sweet biscuit bars, these jacks are baked with cheese and accentuated with a tiny hint of rosemary-- simply delicious, i say. And if you think adding 50 grams of butter is a little too much, just use less or simply omit it since the cheese'll ooze out enough grease to oil your pan anyway. Sound forgiving enough? Your turn to try it!

Cheese Flapjacks
from Cheap as chips, better than toast by Miranda Shearer
makes 12 bars
INGREDIENTS:
  • 150 grams oatmeal (rolled oats) (about 1 1/4 cups)
  • 175 grams Cheddar cheese, grated (about 1 1/2 cups)
    [i used Edam cheese]
  • 1 egg, beaten
  • 50 grams butter or margarine
  • 1/2 teaspoon crushed dried rosemary (optional)
  • 1/2 teaspoon of salt, or to taste
  • 1/4 teaspoon pepper, or to taste
DIRECTIONS:
  1. Mix all the ingredients together well [picture 1].
  2. Press into a shallow baking pan (i used a 24cm round pan) [picture 2] and bake in a preheated oven at 180C/350C/Gas 4, for 40 minutes until golden brown [picture 3].
  3. Cut into slices and serve hot or cold.
Cheese Flapjacks

Sunday, January 17, 2010

Jajangmyeon (Korean Black Bean Noodles)

I heart Maangchi! For any Korean food lover whom (who/whom? i never know how to use them properly) wishes to recreate one of your favorite Korean dishes, Maangchi's website is the place to go. Not only does she have great authentic recipes, but she also provides a video tutorial for every dish. And oh~ how i love her videos! She takes you through each step carefully and yet still captures the essence of Asian-ism with her blind (but accurate) measurements. It's quite a contrast from western cooking where everything is meticulously measured out beforehand. The truth is (okay, i'm speaking in general here), Asians never use measuring cups or spoons when cooking, it just comes naturally! If you don't believe me, just ask the mom of your closest Asian friend, she'll know what i'm talkin' about!

So here's Maangchi's recipe for Jajangmyeon (a.k.a Korean black bean noodles). For those who watch Korean TV dramas should be no stranger to Jajangmyeon-- it's the #1 takeout/delivery food on every show! There's always that scene where the flawless pretty boys (or girls) dive into a bowl of black goo followed by loud, slurping noises. LOOK: i even found this on the 1st page of google images just by searching for "jajangmyeon", LOL. Anyways, the thing about Jajangmyeon is, unless it's with close friends or family, I highly recommend NOT eating this infront of anyone you're trying to impress (i.e. first dates). But who knows, that guy/girl might just fall for your sloppy slurps and tarred mouth. And if they do, it will surely be true love ;)

Jajangmyeon (Korean Black Bean Noodles)
from Maangchi at maangchi.com
INGREDIENTS:
  • Olive oil
  • 1/2 pound (220 grams) pork belly
  • 7 tablespoons black bean paste
  • 1 cup Asian radish, cut into half inch cubes
  • 1 cup sweet potatoes or plain potatoes, cut into half inch cubes
  • 1 cup zucchini, cut into half inch cubes
  • 2 cups onion, diced
  • 3 cups water
  • 2 - 3 tablespoons potato starch powder
  • 2 tablespoons water
  • 1 tablespoon sugar
  • 1 cucumber sliced into thin strips, for garnish
  • One bunch egg noodles
DIRECTIONS:
  1. Cut the of pork into ½ inch (1cm) cubes. Leave the skin on.
  2. Add ½ tablespoon of olive oil to a heated wok. When that’s hot, add the pork and stir fry it until it looks crispy.When the pork is well cooked and the color turns golden brown, drain all the hot fat and set the pork aside. Leave it in the wok for later use [picture 2].

  3. Heat a small skillet over medium heat with 2 tbs of vegetable oil. When that’s hot, add 7 tbs of black bean paste and stir fry for 1 minute [picture 3, 4].
  4. Remove the extra oil and set the black bean paste aside.

  5. Reheat the crispy pork in your wok over high heat, and add 1 tbs of olive oil.
  6. Add radish and sweet potato (or potato) and saute them for 2 minutes.
  7. Then add zucchini and onion and saute them for another 2 minutes [picture 5].
  8. Add 3 cups of water until all the ingredients are submerged, and close the lid and boil it for 15-20 minutes [picture 6].
  9. Open the lid of the wok and skim off the foam from the surface. Add the fried black bean paste from the small skillet and stir it up [picture 7]. To check if ingredients are cooked or not, try a sample potato chunk. It should be cooked, not raw.
  10. Mix 2-3 tbs potato starch powder (or corn starch) and 2 tbs water and add it into the boiling soup and stir it [picture 8]. then the soup ill turn into a sticky sauce.
  11. Add 1 tbs sugar to the sauce and stir it.

  12. Boil water in a big pot, add the noodles and close the lid. Cook for a few minutes according to the direction on the package [picture 9].
  13. Try one sample noodle to check if it’s cooked properly or not. It should be soft and not stiff at all. If it’s cooked, drain the noodles and place them on a large plate or bowl.
  14. Reheat the jjajang sauce and spread over the noodles.
  15. Garnish with cucumber strips and serve it with kimchi or yellow pickled radish.
Jajangmyeon (Korean Black Bean Noodles)

Thursday, January 14, 2010

Daring Cooks' Pork Satay with Peanut Sauce

The January 2010 DC challenge was hosted by Cuppy of Cuppylicious and she chose a delicious Thai-inspired recipe for Pork Satay from the book 1000 Recipes by Martha Day.

Satay was always something that i wanted to make; the only problem was that I never found a recipe that compelled me enough to do so. But thanks to Cuppy, i can now cross out satay from my list of must-make dishes of 2010 :) We had the option to make satay using any type of meat or even with potatoes and tofu. I went ahead and made a pork satay since that's what Cuppy did and things just can't go wrong when you follow the pro ;) This was a very simple recipe and all i had to do was pulse the marinade in my food processor. I did, however, scare myself when my peanut sauce looked very runny while it was cooking. But no worries, the sauce thickened up by itself as it cooled down afterwards. Grilling was not an option with the blizzard outside so I placed them in the oven and they turned out yummy nonetheless. The pork was tender and bursting with flavors but i gotta say, the peanut sauce was even better! I can easily finish a cup of peanut sauce with a loaf of French bread if i wasn't so conscious of JLo's "that's-going-right-into-your-thighs" stare lurking around in the back of my mind. But whatevs, he's gotta deal with it sooner or later so... maybe half a loaf then? j/k.

Pork Satay
INGREDIENTS:
  • 1/2 small onion, chopped
  • 2 garlic cloves, crushed
  • 1 T ginger root, chopped (optional) (2 cm cubed)
  • 2 T lemon juice (1 oz or 30 mls)
  • 1 T soy sauce (0.5 oz or 15 mls)
  • 1 tsp ground coriander (5 mls)
  • 1 tsp ground cumin (5 mls)
  • 1/2 tsp ground turmeric (2-2.5 mls)
  • 2 T vegetable oil (or peanut or olive oil) (30 mls)
  • 1 pound of pork (loin or shoulder cuts) (16 oz or 450g)
  • Feeling the need to make it more Thai? Try adding a dragon chili, an extra tablespoon of ginger root, and 1 tablespoon (0.5 oz or 15 mls) of fish sauce.
DIRECTIONS:
  1. Cheater alert: If you have a food processor or blender, dump in everything except the pork and blend until smooth [picture 1]. Lacking a food processor, I prefer to chop my onions, garlic and ginger really fine then mix it all together in a medium to large bowl.
  2. Cut pork into 1 inch strips.
  3. Cover pork with marinade [picture 2]. You can place the pork into a bowl, cover/seal and chill, or place the whole lot of it into a ziplock bag, seal and chill.
  4. If using wooden or bamboo skewers, soak your skewers in warm water for at least 20 minutes before preparing skewers. Then gently and slowly slide meat strips onto skewers.
  5. Broil or grill at 290°C/550° F (or pan fry on medium-high) for 8-10 minutes or until the edges just start to char. Flip and cook another 8-10 minutes [picture 3].
  6. If you’re grilling or broiling, you could definitely brush once with extra marinade when you flip the skewers.
Peanut Sauce
INGREDIENTS:
  • 3/4 cup coconut milk (6 oz or 180 mls)
  • 4 Tbsp peanut butter (2 oz or 60 mls)
  • 1 Tbsp lemon juice (0.5 oz or 15 mls)
  • 1 Tbsp soy sauce (0.5 oz or 15 mls)
  • 1 tsp brown sugar (5 mls)
  • 1/2 tsp ground cumin (2.5 mls)
  • 1/2 tsp ground coriander (2.5 mls)
  • 1-2 dried red chilies, chopped (keep the seeds for heat)
DIRECTIONS:
  1. Mix dry ingredients in a small bowl. Add soy sauce and lemon, mix well.
  2. Over low heat, combine coconut milk, peanut butter and your soy-lemon-seasoning mix [picture 4]. Mix well, stir often.
  3. All you’re doing is melting the peanut butter, so make your peanut sauce after you’ve made everything else in your meal, or make ahead of time and reheat.

Pork Satay with Peanut Sauce

Tuesday, January 12, 2010

Potato and Leek Soup

I've been gone for quite a while and I'm a bit ashamed to have abandoned my blog (once again) for so long... not really a good start for the new year, huh? Seems like the Daring Kitchen challenges are the only 2 consistent updates that i make each month, with only 1 or 2 extras if i'm feeling generous. Sigh, i'm a bad, baaad blogger :( And it's not even because i don't cook enough, but i just suck at updating! For example, i already have 8 posts with pictures and recipes ready since new years but I just can't seem to get myself to write about them. Hmm, maybe it's time to consider a format change on the blog.... yea, I'll think about it. It's gonna be a new year with a new start; hopefully I can reach my quota of 50 recipes by the end of this year (as opposed to 38 last year and 42 in 2008). We'll see how this goes, shall we?

So back to food: I've had my first encounter cooking with leeks last week! I never really knew what they were or how they should be cooked until my friend, Lauren, introduced them to me. Apparently leeks are quite commonly used in the European household and they are often used as substitutions for onions since they have a much milder onion taste. Leeks can be boiled to flavor stocks, baked into pies, or even eaten raw in salads-- all of which i'm going to try some time in the near future. But for now, here is a recipe for a classic potato leek soup that taste as good as they sound in the many websites and cookbooks that I've read from; hope you enjoy it too!

Potato and Leek Soup
from "Cheap as Chips, Better than Toast" by Miranda Shearer
serves 3 - 4
INGREDIENTS:
  • 375 grams leek
  • 30 grams butter
  • 1 onion, finely chopped
  • 375 grams potatoes, peeled and diced
  • 570 ml stock
  • Good splash of milk
  • 2 teaspoons of sugar (optional)
DIRECTIONS:
  1. Trim off the tops and roots of the leeks and peel away their tough outer layer. Cut the leeks in half and rinse well under cold water. Then chop into little pieces (the soup will be blended so just roughly chop them up!)
  2. Gently melt the butter in a heavy-bottomed pan [picture 1].
  3. Add the leeks and onion, stir until soft (about 5 minutes). Add the potatoes after a couple of minutes and saute them [picture 2].
  4. When they are coated in butter, add the stock, milk and sugar (optional). Let the soup simmer for 20 minutes or until cooked [picture 3].
  5. Blend the soup in a food processor or blender after it as cooled a little.
  6. Reheat the soup on the stove and serve (if it is too thick, add more milk).
Potato and Leek Soup