Friday, May 30, 2008

Chicago Deep Dish Pizza

Yes. One layer wasn't enough for me, i had to go for two. XD I came across a video for Chicago deep dish pizza a while ago and told myself that i have GOT TO make this. I don't think they have deep dish pizzas in Taiwan or Poland so the idea of a 2 layers fascinated me (o goodness, <-- listen to me, I'm such a fatty). The video made the pizza seem TOO easy to be true so i was pretty skeptical about the possibility of a successful home-made deep dish pizza. There were problems alright; I was having a hard time keeping my dough in place cuz it kept sliding down the pan, interfering my topping process. The uncontrollable dough + my notorious PMS (those who know me should know what i mean) drove me crazy and i gave up. I started piling everything on there, sloppily threw on the 2nd piece of dough, and tossed it into the oven. Whatever, I mean, if it really turned out that bad, I can always just eat the topping and throw out the bread. 45 minutes went by and the top of the pizza was golden brown and looked decent enough. But nahhh, my numerous past experiences of soggy pizza bottoms with non-pre-baked dough was enough to tell me not to put my hopes up for this one. I left the pizza sitting there for quite a while, not wanting to know what disasters hid inside...but when i finally did, what'd you know... I actually pulled it off! Ohhh, the joy...! Both layers of dough were properly baked with no sogginess, especially the bottom layer! Wah sai, i was surprised... this deep dish pizza was baked out of pure luck. Chicago Deep Dish Pizza
from video.about.com
INGREDIENTS:
  • One 9" springform pan
  • Pizza dough (recipe here)
  • Toppings of your choice:
    Tomato sauce, sausage, salami, onions, mushrooms, green peppers, cheese...etc.

DIRECTIONS:

  1. Divide the pizza dough in a 55%-45% proportion.
  2. Roll the larger dough 4-5 inches larger than the springform pan.
  3. Generously grease the springform pan.
  4. Place the dough in, making sure it fits nicely, leaving a few inches at the edge.
  5. Layer the bottom half of the pizza with toppings of your choice.
  6. Roll the smaller dough out and place it on top of your toppings.
  7. The edges of both pizza doughs should overlap. Roll the overlapping edges towards the center, tucking in the edges.
  8. Add more pizza topping and bake at Gas 5 for 45 minutes.
  9. If the top is browning too quickly, cover it with foil for the last few minutes of cooking.

Visit the video.about.com (<--click) website for the video.


Chicago Deep Dish Pizza

Tuesday, May 27, 2008

Chocolate Mocha Trifle

Ever since watching one of Nigella Lawson's trifle episodes on TV in Taiwan, I've been keeping my eye out for a trifle bowl so that i could make one of my own. Never found any in Taiwan and couldn't find any in Poland. I went to Ikea last month in search of one but the best thing i could find were these tall glasses that only sold in packages of 6. Of course i didn't buy them and was kind of bummed out cuz i really, really want to make it! I started to get a bit fussy and whine-y at JLo and there was nothing he could do about it either. Well a month went by and one day, out of the blue, i realized the cup that he has been using to keep his coins in was perfect for a trifle! Waha, he's had that cup ever since his first month in Poland (3 years ago)... and it took us both that long to realize his coin cup could be used for other purposes too. So there, that's was my little story on how i found a cup to make this eye-candy of a trifle. Don't hurt me for making you read this far XD...but please do take a look at the recipe:

Chocolate Mocha Trifle
derived from allrecipes.com
INGREDIENTS:
  • Brownies (cut into 1 inch cubes)
  • 200 mL of whipping cream (30%)
  • 2 teaspoons of sugar
  • 1 package of chocolate pudding.
  • 3 tablespoons of coffee granules
  • chopped almonds

DIRECTIONS:

  1. Add the sugar to the whipping cream and whip until stiff peaks form.
  2. Combine pudding powder with the coffee granules and cook the pudding according to package directions.(Add pudding with milk and heat until it becomes thick. Some pudding packages may require you to add some sugar.)
  3. Allow the pudding to cool down and fold in about 1/3 of the whipped cream.
  4. Layer your trifle cup/bowl with brownies, pudding, chopped almonds, whipped cream.
  5. Repeat layering until all ingredients are used. End with whipped cream.
  6. Garnish with chopped almonds and chocolate shavings.
  7. Chill 1 hour in refrigerator before serving.

(click to enlarge)

Saturday, May 24, 2008

Beef Wellington

According to the trusty Wikipedia:
"Beef Wellington is a preparation of beef tenderloin coated with pâté (often pâté de foie gras) and duxelles, which is then wrapped in puff pastry and baked."
Believe it or not, Hell's kitchen is what introduced me to Wellingtons... I have never seen or heard of them before that. That show really popularized that dish (you'll know what i mean if you watch the show)... cuz Gordon Ramsay's ALWAYS yelling about it. For the first few seasons, 90% of the time, there were always problems with the wellingtons... and the way Ramsay deals with those problems... really makes an impression on you ;) Anyways, JLo and I always wondered why those chefs kept screwing up... were wellingtons really that hard?! Well after finally making them myself, the answer to our question is: NO. They're are NOT hard to make. But they are, however, hard to perfect. Our wellington tasted good... but the problem was the pastry, ARGH! It didn't rise in the bottom, got all soggy, and broke apart when i tried to remove it from the pan... still need to find a solution for that. But yea, my pastry problem didn't lower spirits... cuz i thoroughly, whole-heartedly, 100%-edly enjoyed my food, thank goodness I'm not a perfectionist!


Gordon Ramsay rocks my socks.
Beef Wellington
from Gordon Ramsay
INGREDIENTS:
  • 400g Beef fillet
  • 400g Flat mushrooms
  • 4 slice Parma ham
  • English mustard for brushing meat
  • 200g puff pastry
  • 1 egg for brushing pastry

DIRECTIONS:

  1. Pre-heat the oven to 200c.
  2. Heat some oil in a large pan and quickly fry the seasoned beef all over until it’s brown. Remove and allow to cool.
  3. The point of this is simply to sear the beef and seal all those juices in, you don’t want to cook the meat at this stage. Allow to cool and brush generously with the mustard.
  4. Roughly chop the mushrooms and blend in a food processor to form a puree. Scrape the mixture into a hot, dry pan and allow the water to evaporate. When sufficiently dry (the mixture should be sticking together easily), set aside and cool.
  5. Roll out a generous length of cling film, lay out the four slices of Parma ham, each one slightly overlapping the last. With a pallet knife spread the mushroom mixture evenly over the ham.
  6. Place the beef fillet in the middle and keeping a tight hold of the cling film from the outside edge, neatly roll the parma ham and mushrooms over the beef into a tight barrel shape.
  7. Twist the ends to secure the clingfilm. Refrigerate for 10 -15 minutes, this allows the Wellington to set and helps keep the shape.
  8. Roll out the pastry quite thinly to a size which will cover your beef. Unwrap the meat from the cling film. Egg wash the edge of the pastry and place the beef in the middle. Roll up the pastry, cut any excess off the ends and fold neatly to the ‘underside’. Turnover and egg wash over the top. Chill again to let the pastry cool, approximately 5 minutes. Egg wash again before baking at 200c for 35 - 40 minutes. Rest 8 -10 minutes before slicing

Basic Steps:

NOTE: i used button mushrooms, normal ham, and normal mustard.


Beef Wellington

Wednesday, May 21, 2008

Strawberry Chocolate Mousse Cake

The picture on the left is my 3rd (and finally successful) attempt at making mouse cakes. For the sake of writing whatever to filling up a (what would have been) blank page, here's a brief history of my previous unfortunate failures:

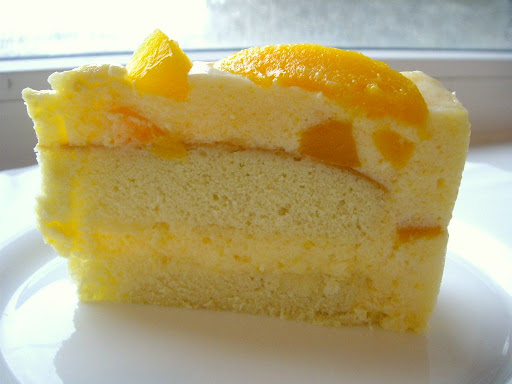
Failure #1: Peach Mousse Cake
Yes okay, structural-wise, there was nothing wrong with it. But it tasted like nothing but pure sugar... I don't know why I even bother calling it a Peach cake. And now that I think of it, what was I thinking giving my roommate a slice?! She must've thought I was purposely trying to put her into a diabetic coma (hyperglycemic). Sorry, my bad... :P
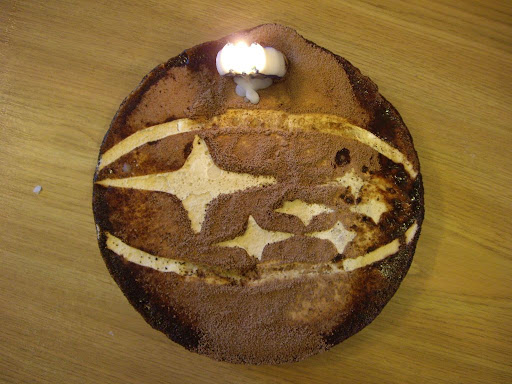
Failure #2: Coffee Mousse Cake (picture 2)
This mousse cake currently ranks as my Number One culinary disaster. I actually re-made the cake twice. And to make things even worse... this was actually JLo's 24th birthday cake. HAHAHAHA. I know, I know... I deserve a bad-girlfriend-slap. But hey, at least i tried decorating it into a Subaru sign (his favorite) and making it coffee-flavored (his other favorite)! The cake was basically raw dough and the mousse was basically... a layer of crap.

Now back to my 3rd attempt: Strawberry Chocolate Mousse Cake. My my, just when i was about to give up on anything having to do with mousse, God showed me kindness XD. It's true what they say--with low expectations, comes great satisfaction. This has become JLo's favorite non-coffee dessert (which is a rare thing). I am also happy to say that mousse cakes have officially become my favorite type of dessert.

Strawberry Chocolate Mousse Cake
makes one small 5.5'' cake
INGREDIENTS:
  • 1 layer of chocolate cake/brownies.
  • 300g fresh strawberries
  • 2 tablespoons fine sugar
  • 1 egg yolk
  • 1 teaspoon vanilla essence
  • 3 tablespoons chocolate powder
  • 2 teaspoons un-flavored gelatin
  • 150 mL milk
  • 1.5 cup whipping cream (30%)
  • 1 tablespoon sugar

DIRECTIONS:

  1. Prepare the layer of cake/brownie and place it in your cake mold.
  2. Slice 1/2 of the strawberries in half, arranging them around your mold (touching, side-by-side, pointed ends up, with cut sides against the side of the mold).
  3. Place the remaining half of strawberries in the center. Set aside [picture 1].
  4. In a bowl, mix together sugar, egg yolk, vanilla, and chocolate powder.
  5. In another small saucepan, add gelatin and milk. Heat until gelatin is dissolved.
  6. Pour the milk mixture into the chocolate mixture and mix well. (Place the bowl in cold water bath while mixing, the mixture should start to thicken as the temperature cools down) [picture 2].
  7. In a seperate bowl, whip the cream with 1 tablespoon of sugar until stiff peaks form [picture 3].
  8. Fold the whipped cream into the chocolate mixture until blended thoroughly [picture 4].
  9. When done, pour it into your mold until it covers the strawberries.
  10. Refrigerate until set (4 hours).
  11. Decorate and serve!


Strawberry Chocolate Mousse Cake

Sunday, May 18, 2008

Sausage/Ham Buns

So my freedom and 閒-ness is coming to an end as most of my finals and hospital trainings are coming up. But who knows, I might just keep on updating/baking to get away from it all. Ahh crap... I don't want to go back to the school routine, i have adapted too well and made myself too comfortable to this unproductive month... It's gonna be hard fixing my chaotic biological clock. And even harder to shift back to the studying mode. Gahhh.... 1 more month of suffering... then 3 months of fun. I'll just have to suck it up.

Enough with the complaining, I'm here to post the recipe for the sausage buns that i made 2 weeks ago. These buns were quite the challenge. It took me 2 tries to make a some-what fluffier/softer bread...but it still didn't quite get there >:( Whatevers. I blame it on the crappy Eskulap (dorm) oven. Kneading it was also distressing... makes me want to buy a bread machine. Argh, how do tw bakeries keep their bread so soft?? I'm gonna find out this summer... But anyways, I figured out a super efficient, fool-proof way to raise dough though... If you have a empty cabinet/ big drawer, just put your dough in there along with a cup of hot boiling water (you'll have to re-heat the water once or twice). Quicker, better rising guaranteed!

Sausage/Ham Buns
should make 5 big buns
INGREDIENTS:
  • 1/2 cup + 1 tablespoons milk
  • 1/4 cup sugar
  • 1 package (2 1/4 teaspoons) instant dry yeast
  • 2 cups all-purpose flour
  • 1/2 teaspoon salt
  • 1 egg
  • 1.5 tablespoons butter
  • 5 sausages/hot dogs (or 5-6 slices of ham)
  • bunch of chopped spring onions
  • egg yolk for brushing
DIRECTIONS:
  1. Combine milk + sugar. Heat until sugar is dissolved, then let it cool until it becomes warm (not too hot or else you'll kill the yeast).
  2. Put flour, yeast, salt in a big bowl and mix until blended.
  3. Add the milk, egg, and butter into the flour mixture and mix until it forms a rough ball.
  4. Knead the dough until smooth and elastic (about 10-15 minutes).
  5. Place the dough in a air-tight container (or cover with plastic wrap) and let it rise until doubled in size (about 1 hour).
  6. When the dough has risen, take it out and separate it into 5 even balls.
  7. Roll out the dough enough to wrap your sausage (or slightly bigger than your slice of ham).
  8. For Sausage: wrap your sausage up with the dough and use a knife to cut 5 small pieces (do not cut through). Twist the 5 pieces around to form a flower.
  9. For Ham: cut the dough into 5 separate pieces and place them together forming a flower.
  10. Let the dough rise again in an air-tight environment (about 1 hour).
  11. Before putting it into the oven, brush the top with egg yolk and sprinkle spring onions and salt.
  12. Bake for 10-15 minutes until bread is done or golden brown.

NOTE: If your bread turns out hard, steam it for a few minutes before serving!

Basic Steps:


Sausage/ Ham Buns